You and I love King’s Hawaiian bread, so why not take that pillowy soft sweet dough and turn them into Hawaiian Sweet Cinnamon Rolls! The dough is perfumed with food-grade sweet orange and lemon essential oils to give us that signature scent, and we are able to achieve that deep, gorgeous browning due to the brown sugar and diastatic malt powder in the dough. This recipe is a keeper and a game-changer.

How to make Hawaiian Sweet Cinnamon Rolls
Before we begin, I have to STRESS that you NEED A KITCHEN SCALE! I’m not about to argue with yall.
If you use “cups”, which I try to provide for those on the ancient late bus, I cannot guarantee your results. I just can’t. Using cups will ALWAYS vary and be inconsistent. Conversion charts also vary depending on the user, and aren’t always universal for every recipe.
When using the ‘spoon in and level’ method, my 1-cup measuring cup got me 126 grams of bread flour per cup. When using the scoop and level method, I get 145 grams per cup. Insert headache! Toss the measuring cups and grab your scale. I don’t play about accuracy, which is why I also use a jewelry scale (better known as a weed scale), because it’s even more sensitive and weighs delicate ingredients such as yeast more accurately.
The bread flour I’m using is from King Arthur, which is available everywhere. Their bread flour contains 12.7% protein. You can use any bread flour that contains that same amount of protein. Brands vary, so please pay attention. You’ll have to adjust the flour amounts accordingly if your bread flour protein percentage is higher or lower. If all you have is all-purpose and you absolutely cannot get a hold of bread flour, you will need to work the dough even longer to develop more gluten. That could be hell for your mixer, though.
The process in a nutshell
- Make the warm milk mixture
- Add the flour mixture
- Knead the dough
- Proof the dough
- Roll out and add the filling
- Proof once more
- Bake and glaze
Tired of dry ass cinnamon rolls?
Me too, bih. So, stick with me.
We all know cinnamon rolls are divine when they’re freshly baked. The issue develops as they age. Even a full 24 hours later, you’ll start to notice the dough is drying out, they’re crusty, and now we HAVE to reheat them just to get a smidge of the freshness we had 24 hours prior. If they’re 48 hours old, it’s even worse.
The butter is to blame, and there’s a LOT of butter in any given cinnamon roll recipe. Butter, while delicious, poses a problem for most baked goods. The flavor is A-1, but the performance is giving C-student. Butter contains quite a bit of water, and when that water is baked it evaporates. So as time passes, our baked goods just get drier and stale out quickly. We want to keep the flavor of butter, but also the moisture that we lose over time.
The solution? Add oil. Reduce the butter just a little bit, and replace that reduction with a neutral oil. I’m using avocado oil for this recipe, but you can use vegetable oil, canola, or any flavorless oil that you have on hand. The oil is going to help keep these rolls soft and supple even at room temperature, while the butter flavor stays strong.
The end result? Gooey, buttery soft cinnamon rolls even at room temperature a full day later. That was my ultimate GOAL for this recipe. I have quite a few cinnamon roll recipes on my blog, and they’re all delicious, but they needed a textural improvement. This fat fix is the key. Along with diastatic malt powder.
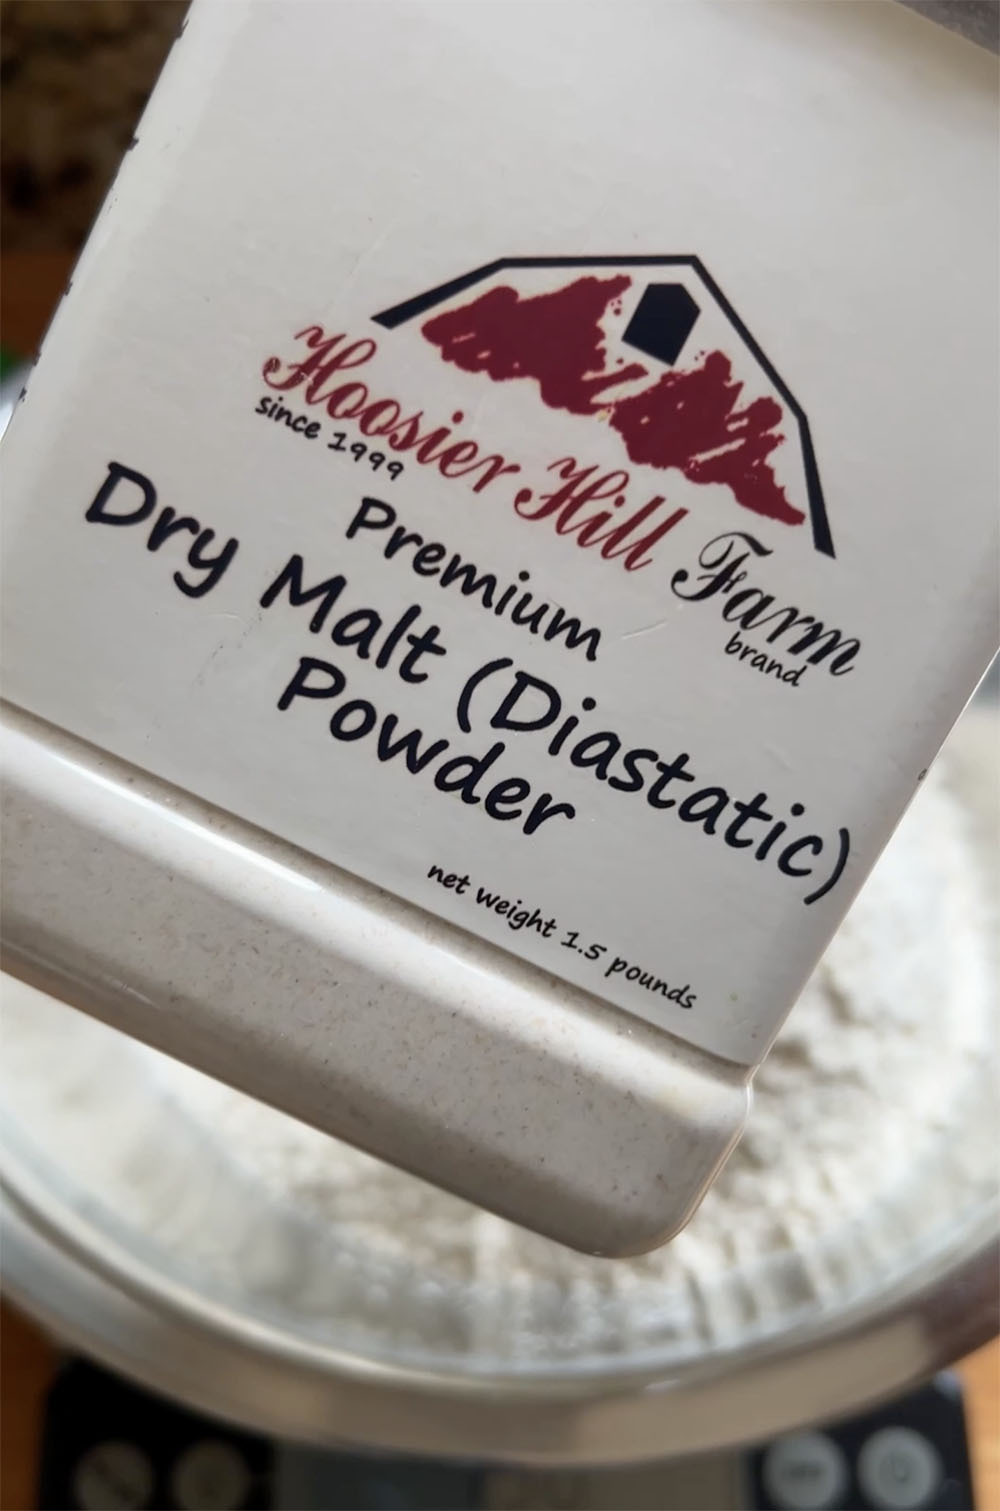
WTF is diastatic malt powder?
Diastatic malt powder is literally life-changing when it comes to yeasted doughs. If you’ve ever wanted to replicate the texture of baked goods from a bakery, I promise it’s an ingredient you 1000% need in your pantry. Basically, diastatic malt powder breaks down starches into sugar, which helps with rise, crust, and crumb texture in doughs. You end up with a far more tender product with it than without it. It is a baker’s secret weapon!
Where to buy? You can find diastatic malt powder at some grocery stores, even Walmart. It’s for sure easily available online. I grabbed it from Amazon and received it the very next day. Please don’t be intimidated by ingredients you’ve never heard. I promise it’s okay! These things will make you a better cook, so they’re always worth exploring.
Heavy cream poured on the dough?
Completely unnecessary for this recipe. While heavy cream is definitely a delicious fat that soaks up beautifully in cinnamon rolls, we don’t need to drench these in cream at all because we’re adding heavy cream to the filling. This way, the cream soaks into each layer, helping give us that cinnamon-sugary goo that we all love and hope to achieve. Also, the dough itself is already extremely pillowy and feathery, we don’t need to drown them in cream.
To glaze or not to glaze
This is up to you. As someone who doesn’t like cloyingly sweet desserts the older I get, I actually prefer these without a thick glaze. For me, it’s either no glaze at all, or just the smallest drizzle. But I know you guys love your glaze, so these are beautifully glazed up just for the pictures lol.
I’m going to provide you with a standard glaze recipe, but I highly recommend you use the most restrained amount (like, a tablespoon per roll) for your batch, because you just may find them to be sweet enough without it. You can always add more later if you prefer. Everyone’s sugar tolerance is different, so you may want to pile it on. The recipe amounts for “piling it on” is listed below. For those of you who don’t like things too sweet, make the glaze but use very little of it, try it, then proceed.
How to store Hawaiian Sweet Cinnamon Rolls
Either cover the dish you baked them in really well with plastic wrap, ensuring no air can get in, or transfer the cooled cinnamon rolls to an airtight container with a sheet of plastic wrap under the lid to keep even more air out.
Baked rolls can also be individually wrapped in several layers of plastic wrap and frozen for a sweet treat later.
How to reheat Hawaiian Sweet cinnamon rolls
Place each roll on a microwave-safe plate, then zap at 60% power for 15-20 seconds or until warmed through to your personal liking.
Can these be made ahead?
The dough can be made a day ahead. After you’ve kneaded it, brush the dough with a VERY thin layer of oil to prevent it from drying out. Cover the bowl tightly with plastic wrap for up to 24 hours in the refrigerator for a cold proof. It should double in size during this time. To proceed, bring the cold dough to room temperature for about one to two hours. The dough is easier to work with once it’s room temperature. From there you can roll it out, add the filling, roll it back up and portion it. Proof one final hour before baking.
The reason I don’t recommend refrigeration AFTER you’ve portioned the filled rolls is because the sugars will eventually melt, especially with the addition of the cream, and you might have a big mess. You can always experiment and let me know if it actually works for you, though.
With all of that said, watch the video and please enjoy the recipe!
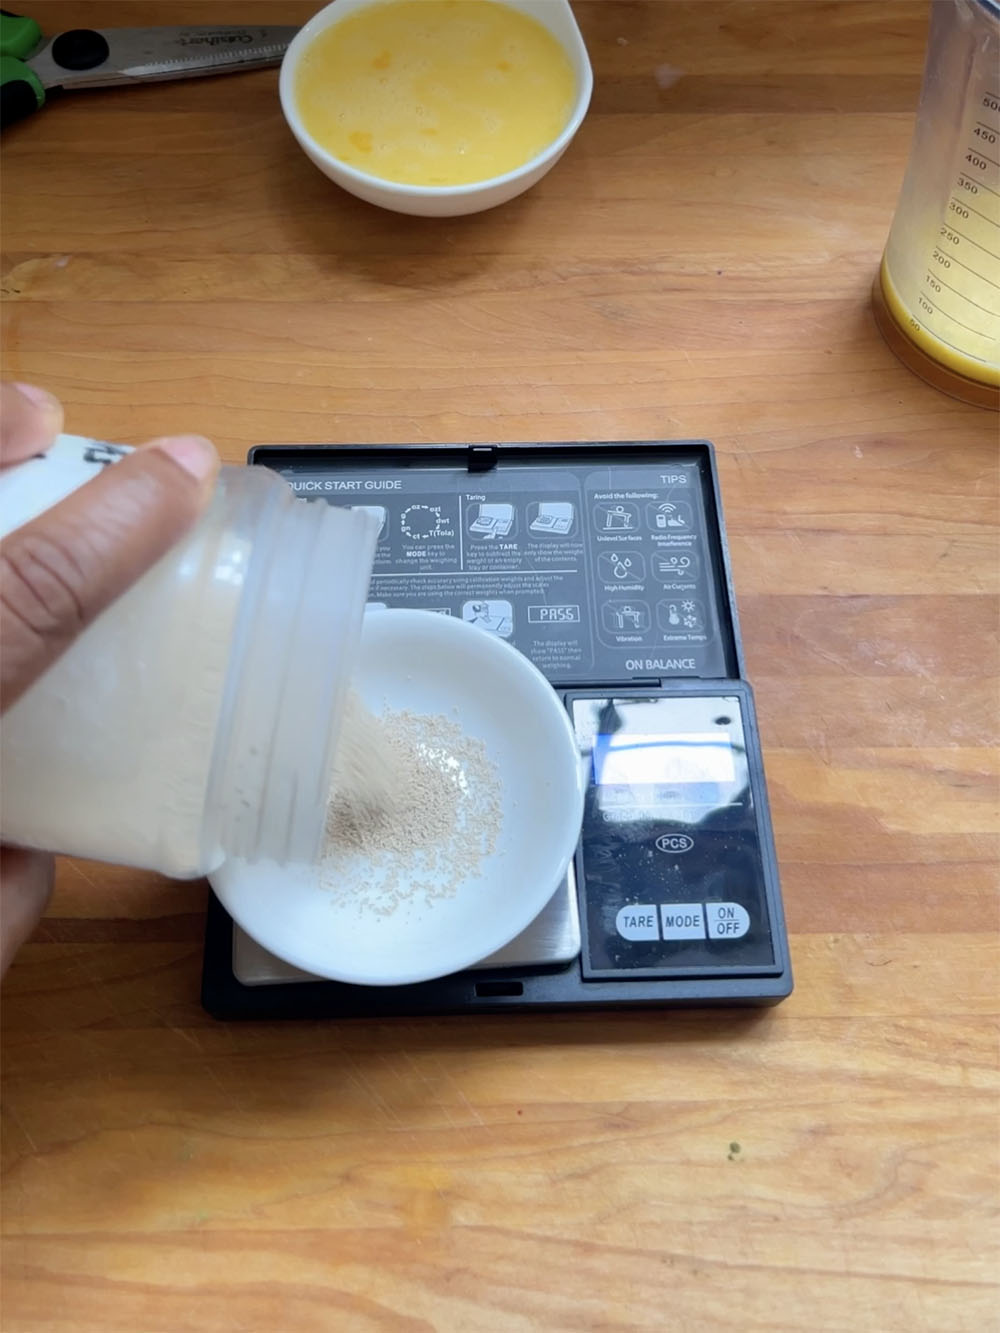
weighing the yeast
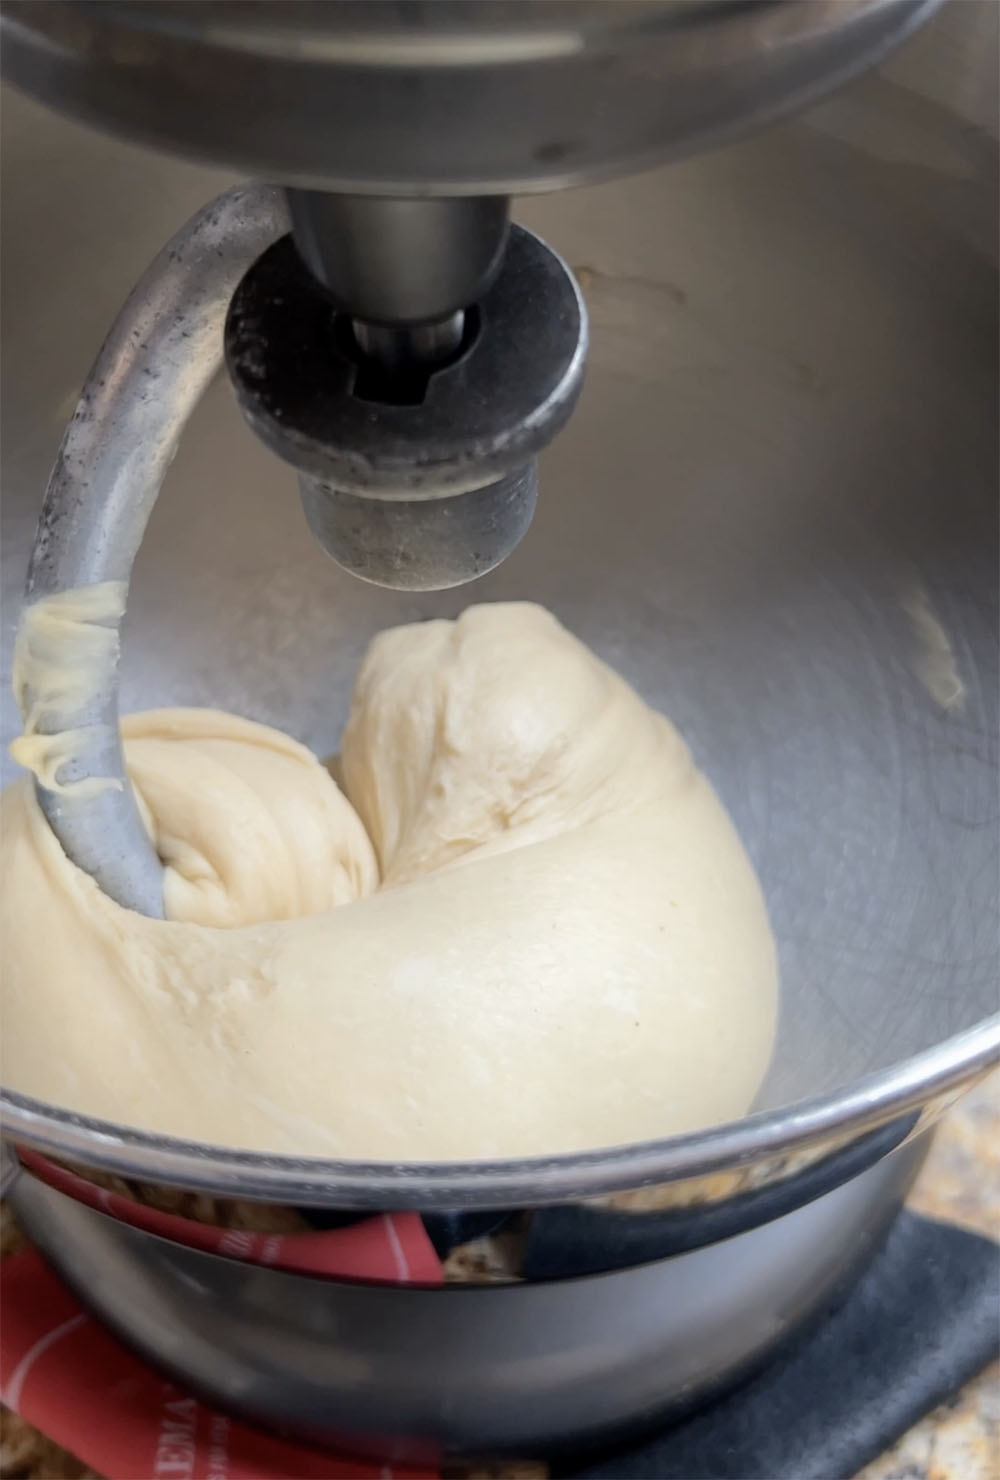
dough clearing sides of bowl
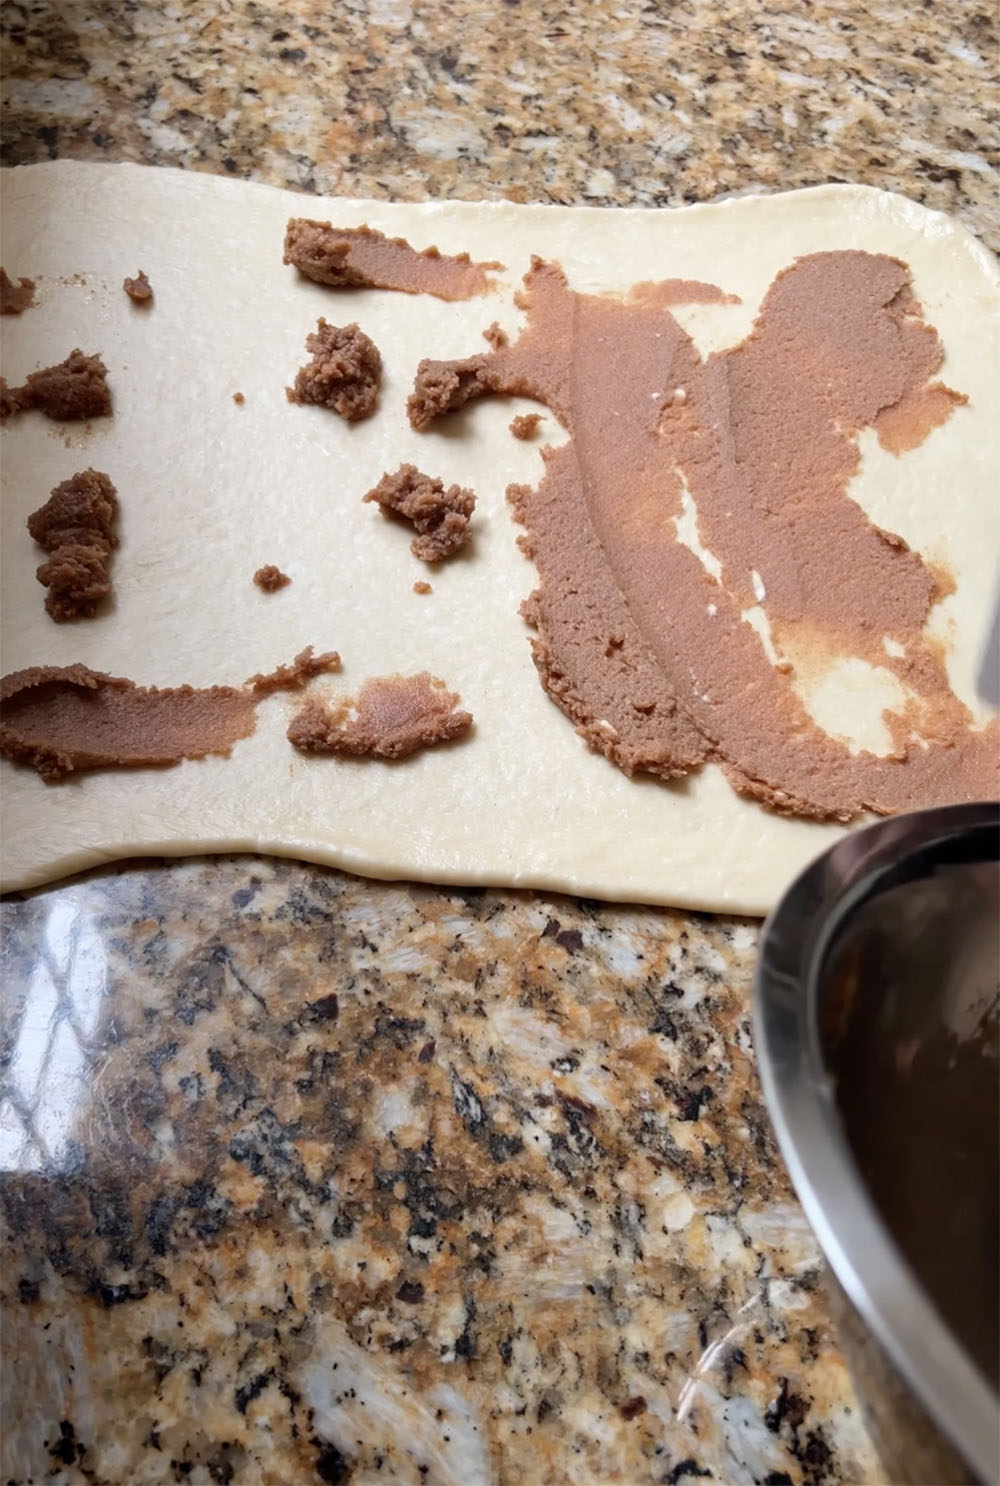
spreading the filling on the dough
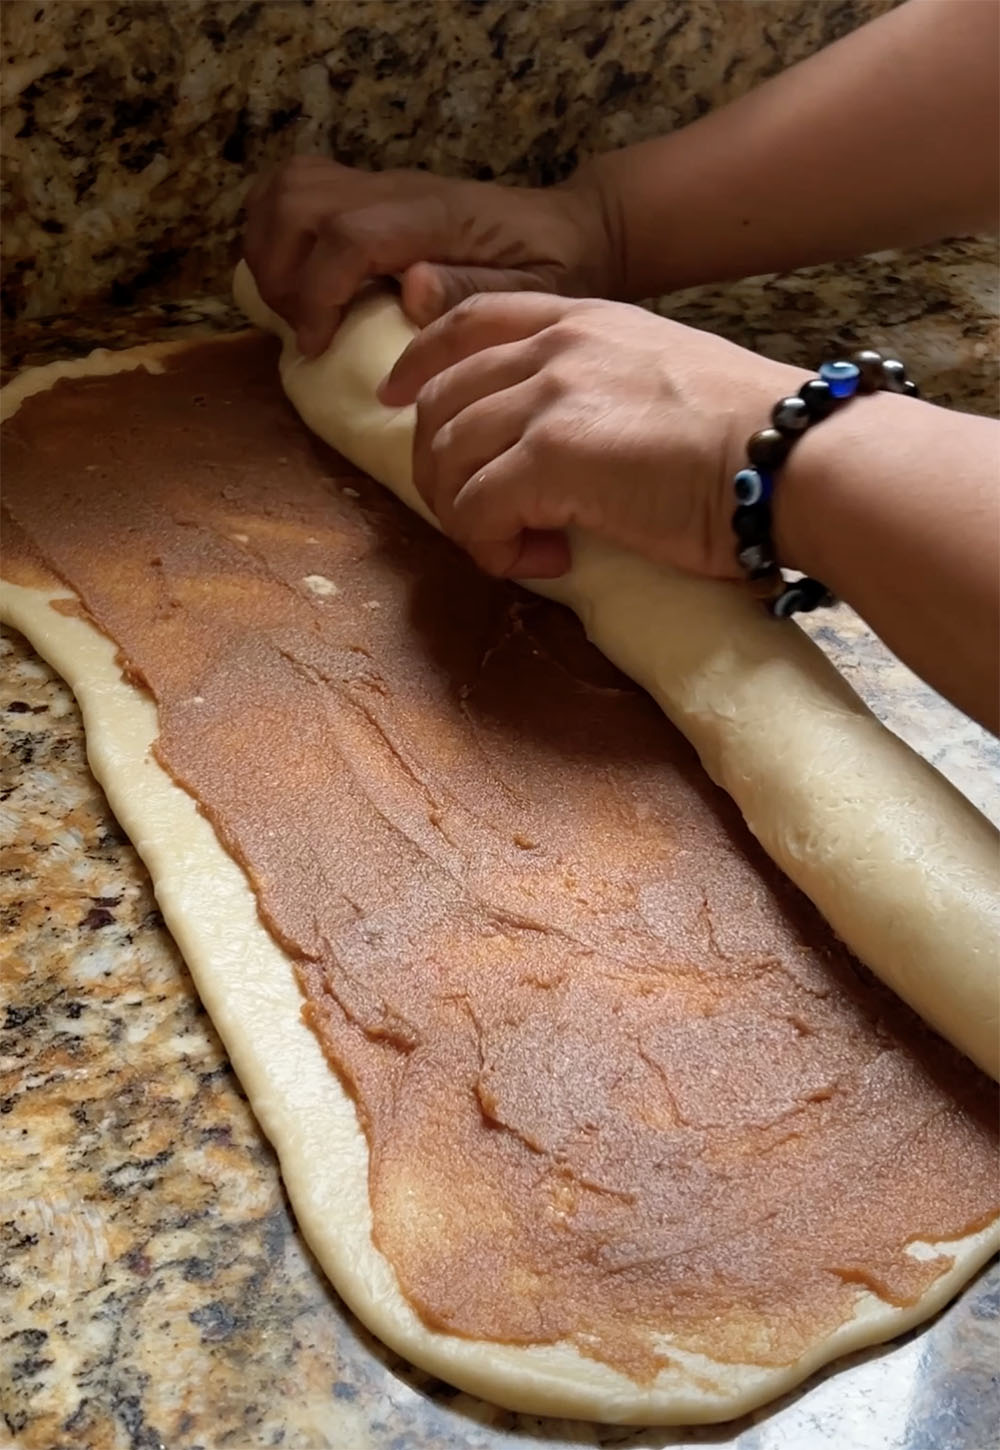
rolling the cinnamon rolls
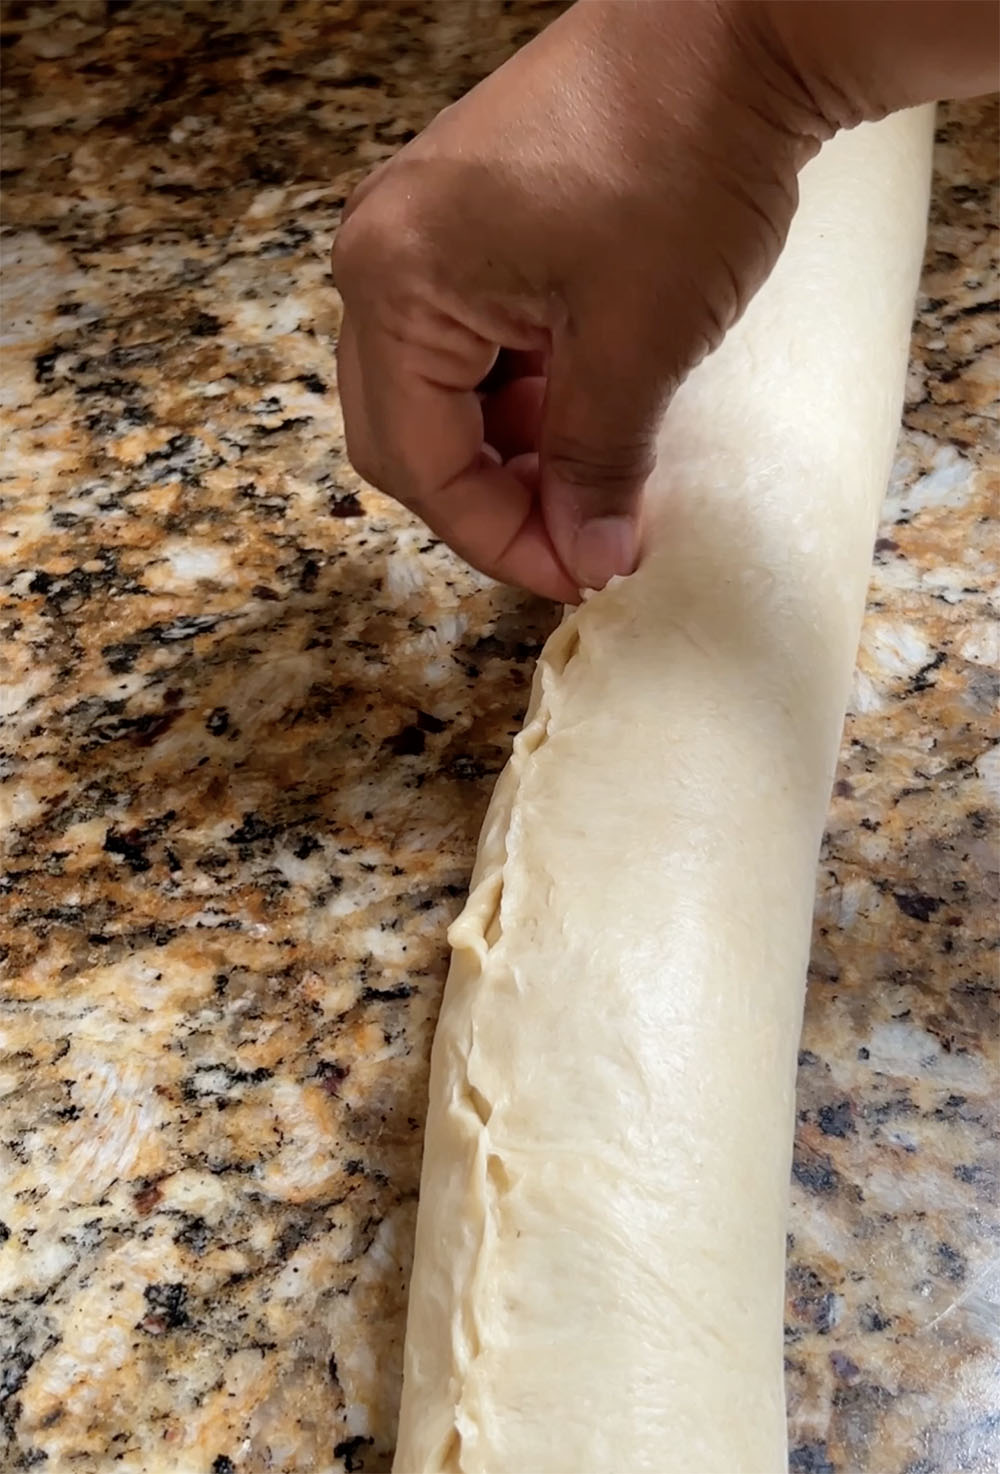
pinching the dough closed
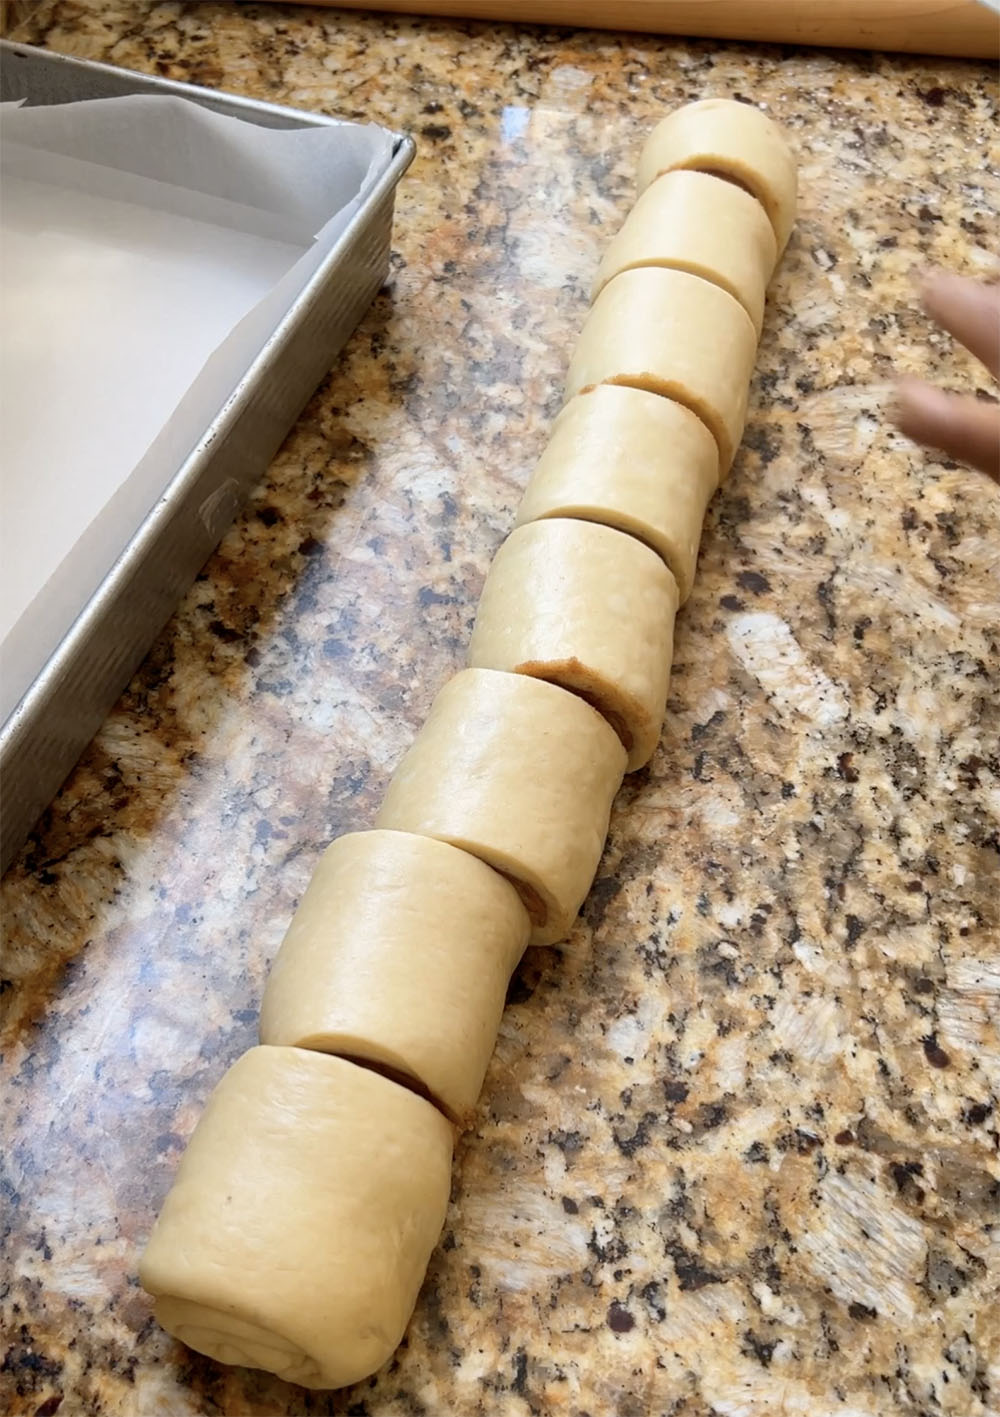
cutting the cinnamon rolls
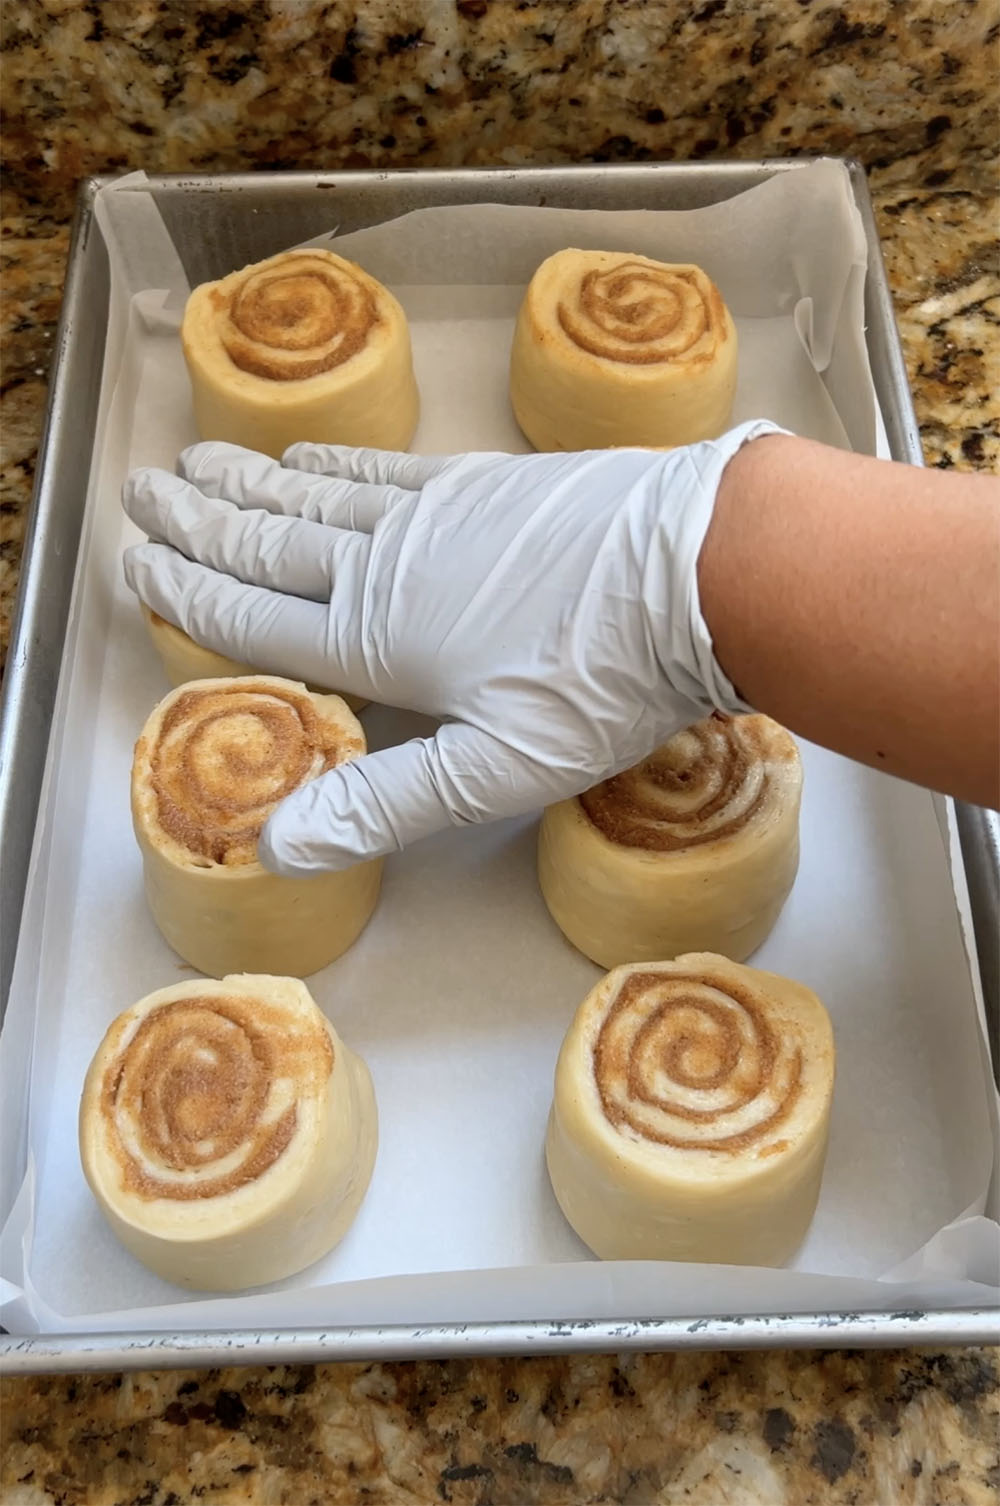
gently pressing the rolls down
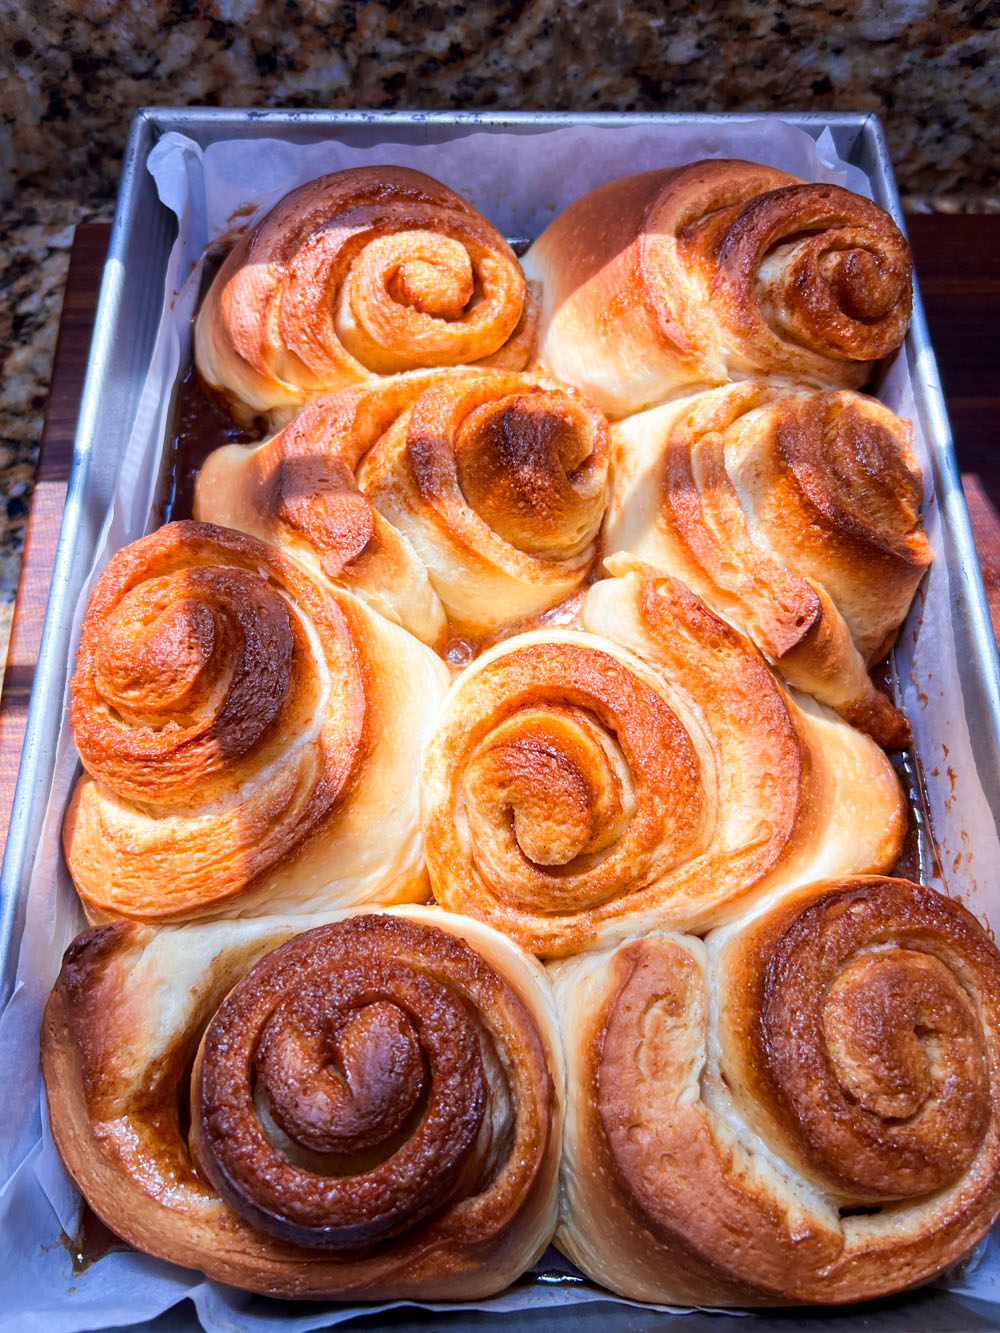
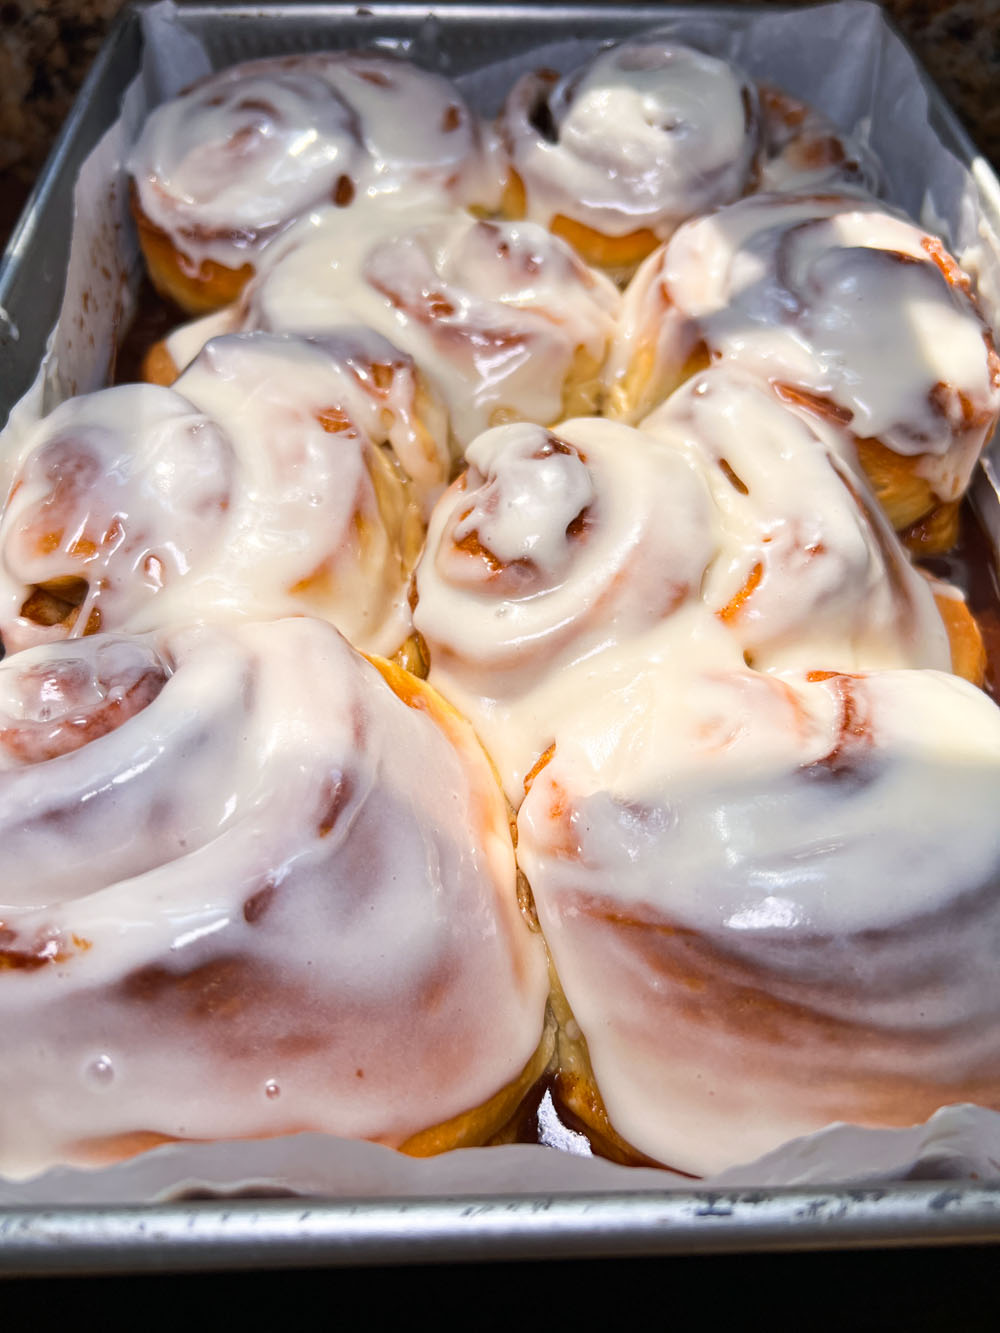
freshly baked hawaiian sweet cinnamon rolls
Check out my other cinnamon roll recipes!
Print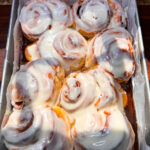
Hawaiian Sweet Cinnamon Rolls
- Total Time: 4 hours 30 minutes
- Yield: 8-12 cinnamon rolls
Description
It’s time to turn up this cozy season with this incredibly decadent cinnamon roll recipe using a hawaiian sweet dough just like King’s Hawaiian! Dough recipe slightly adapted from ChefSteps.
Ingredients
Hawaiian Sweet Dough
- 250 grams whole milk (a little over 1 cup)
- 90 grams salted butter (6 1/2 tablespoons)
- 35 grams avocado oil (or any neutral oil), a little over 2 tablespoons
- 100 grams light brown sugar (1/2 cup)
- 70 grams eggs, beaten (SEE NOTE)
- 7 grams instant yeast (2 teaspoons)
- 450 grams King Arthur bread flour, between 3 1/2 cups-3 3/4 cups (SEE NOTE)
- 18 grams diastatic malt powder (a little over 2 tablespoons)
- 8 grams Diamond Crystal kosher salt (2 teaspoons)
- 1.5 grams orange essential oil (1/4 teaspoon, FOOD GRADE)
- .75 grams lemon essential oil (1/8 teaspoon, FOOD GRADE)
Filling
- 250 grams light brown sugar (1 1/4 cups)
- 113 grams butter, softened (1 US stick, 8 tablespoons)
- 8 grams ground cinnamon (1 tablespoon)
- 5 grams all-purpose flour (1/2 tablespoon)
- 35 grams heavy cream (about 2 1/2 tablespoons)
- 2 grams fine sea salt (1/4 teaspoon, OMIT or halve if using salted butter)
Glaze
- 260 grams confectioners sugar (2 cups)
- 60 grams cream cheese, softened (2 ounces) *OPTIONAL, see note
- 40 grams whole milk (just under 3 tablespoons)
- 1 teaspoon vanilla extract
- fine sea salt, to taste
Equipment you need
- Stand mixer
- Instant-read thermometer
- Kitchen scale (important!)
- 13x9 baking dish
- Parchment paper
- Rolling pin
- Plastic dough/bowl scraper
- Plastic wrap
- Offset spatula (small)
- Extremely sharp THIN blade, OR unflavored dental floss to cut the rolls
Instructions
Before you begin:
- Weigh all of your ingredients out first! I do NOT recommend you use “cups” for this recipe because it will not turn out right, but I gave them to you anyway to use as an approximate reference. This recipe always turns out perfect when you weigh the ingredients on a scale.
- Bring the butter for the filling to room temperature an hour (or longer) before you plan to use it. Slicing it into thin pieces or shredding it on a cheese grater will help it soften faster. If microwaving, do so at 40% power in 15 second intervals.
- Beat two large eggs together, then portion out 70 grams into a smaller bowl. Save the leftover eggs for another use.
- Add the bread flour, instant yeast, diastatic malt powder, and kosher salt to a medium-sized bowl, making sure to keep the yeast and salt from touching. You’ll whisk this mixture together when it’s time to add it to the stand mixer.
- Combine the ingredients for the glaze in a small bowl and whisk until combined. Set aside until ready to use.
- Line a 9×13 baking dish with parchment paper for easy cleanup.
To make the dough and filling
- Add the milk, brown sugar, avocado oil, and butter in a medium-sized pot over medium-low until the butter is melted. Turn off the heat and whisk to make sure the brown sugar until it’s fully dissolved. The internal temperature will more than likely climb upwards of 150+ degrees F. Pour the hot milk mixture into the bowl of your stand mixer and let it cool until the temperature drops to around 120 degrees F. When it does, add the beaten eggs, and essential oils. Mix together briefly on the lowest speed for about 30 seconds.
- Finally, whisk together the bread flour, instant yeast, diastatic malt, and kosher salt, then carefully spoon the flour mixture into the butter/egg mixture, while still on the lowest speed. When all of the flour mixture is combined, increase the speed to medium and knead the dough for 15-20 minutes, or until it pulls away from the sides of the bowl. Secure the stand mixer however you can to prevent it from wobbling off the counter, because I promise if you don’t, it will fall off.
- After 15-20 minutes, the dough should be clearing the sides of the bowl and feel supple to the touch. See video for reference.
- Cover bowl with plastic wrap and allow the dough to rest and proof for 2 hours in a warm spot (such as a turned-off oven with just the oven light on). It should double in size.
- Meanwhile, make the filling. Add the butter, brown sugar, all-purpose flour, cinnamon, salt, all-purpose flour, and heavy cream to a small bowl and mix until well blended. Cover and set aside.
- Combine the ingredients for the glaze in a small bowl and whisk until combined. Set aside until ready to use.
- Turn the proofed dough onto a clean surface. The dough should not be sticking to the surface, but if it is, sprinkle the LIGHTEST dusting of flour if you need to. Press gently to release any air bubbles, then roll into a large rectangle. For 8 large Cinnabon-sized rolls, make sure the widest part measures 20 inches. My dough was rolled 20×15.
- Dollop the brown sugar mixture all over the rolled dough, then spread into an even layer using a small offset spatula, leaving a 1-inch border at the top of the dough (where the roll will end) without any mixture. Gently and carefully roll the dough into a secure log.
- When you get to the clean edge, use the tips of your fingers to gently stretch (pull the dough gently for some slack), pinch and seal it shut. When it’s sealed, turn the log sealed-side down and ensure its in an even and straight line. If necessary, lift and manipulate the log until it measures 20 inches across. To portion the rolls, cut the log directly in half, then each half in half, and so on, until you get 8 large rolls that measure about 2.5” wide. You could also make 12 smaller rolls, that would be about 1.75” wide. Decide how many rolls you want, and just divide that number by 20.
- Place the rolls into the prepared 9×13 baking dish lined with parchment paper, ensuring there’s a little space between each roll. Gently press the rolls down just a tiny bit. Cover with plastic wrap and proof in a warm spot for 1 hour.
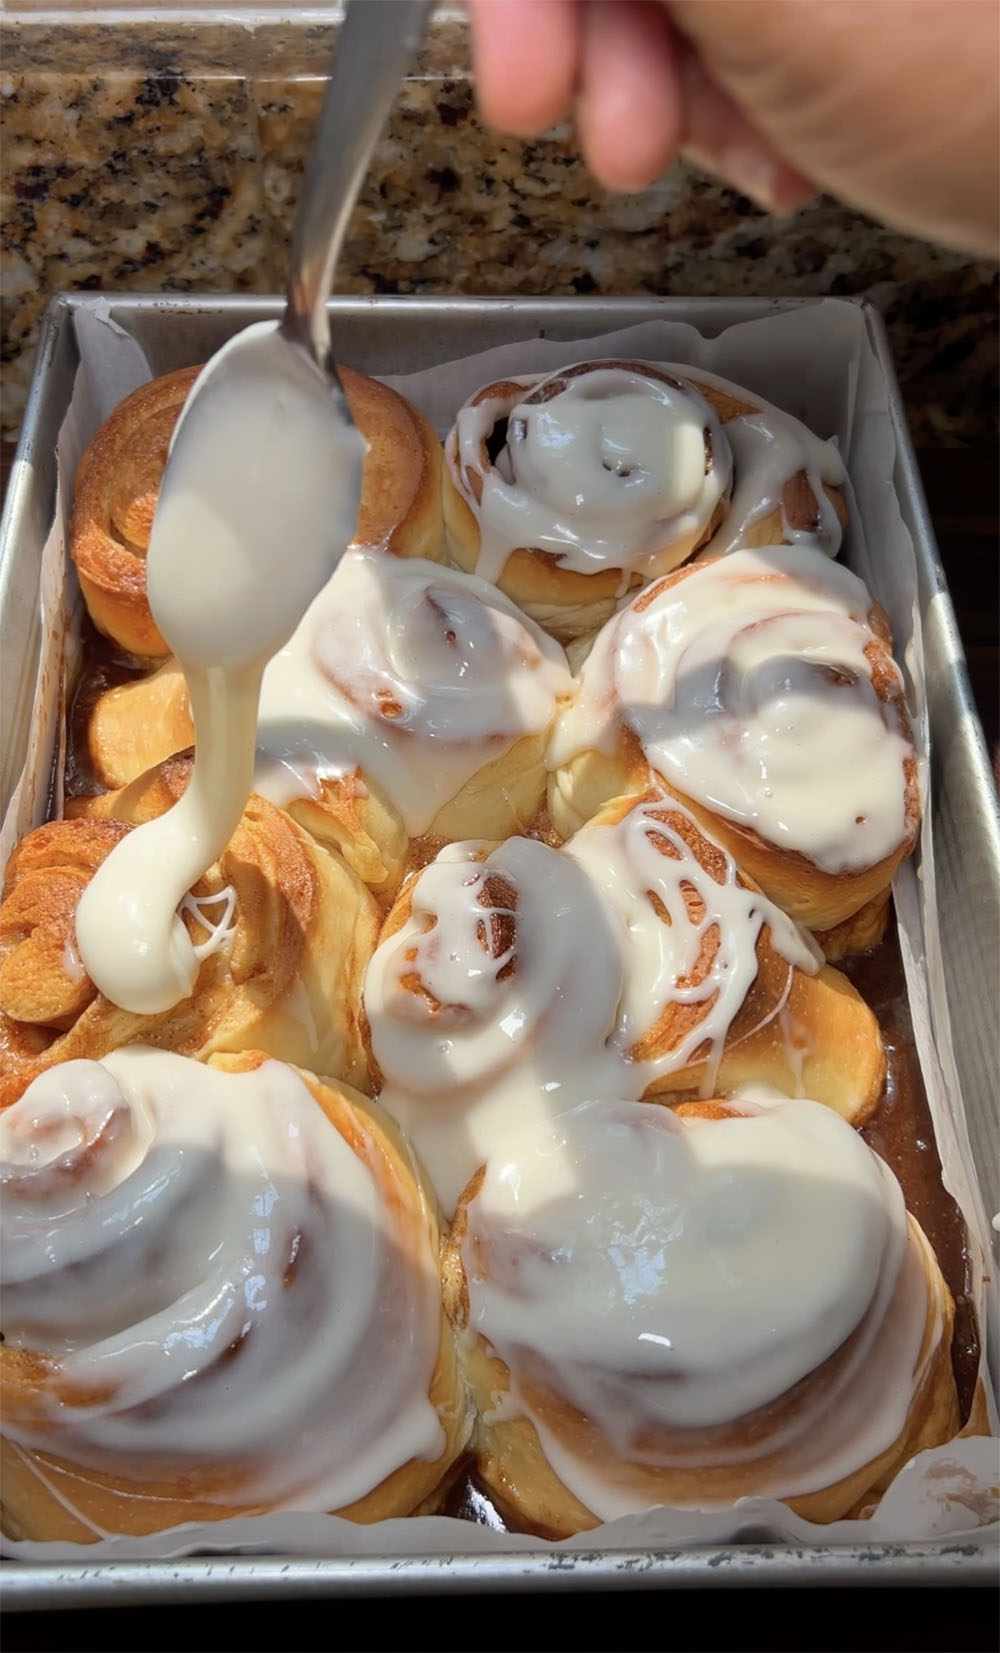
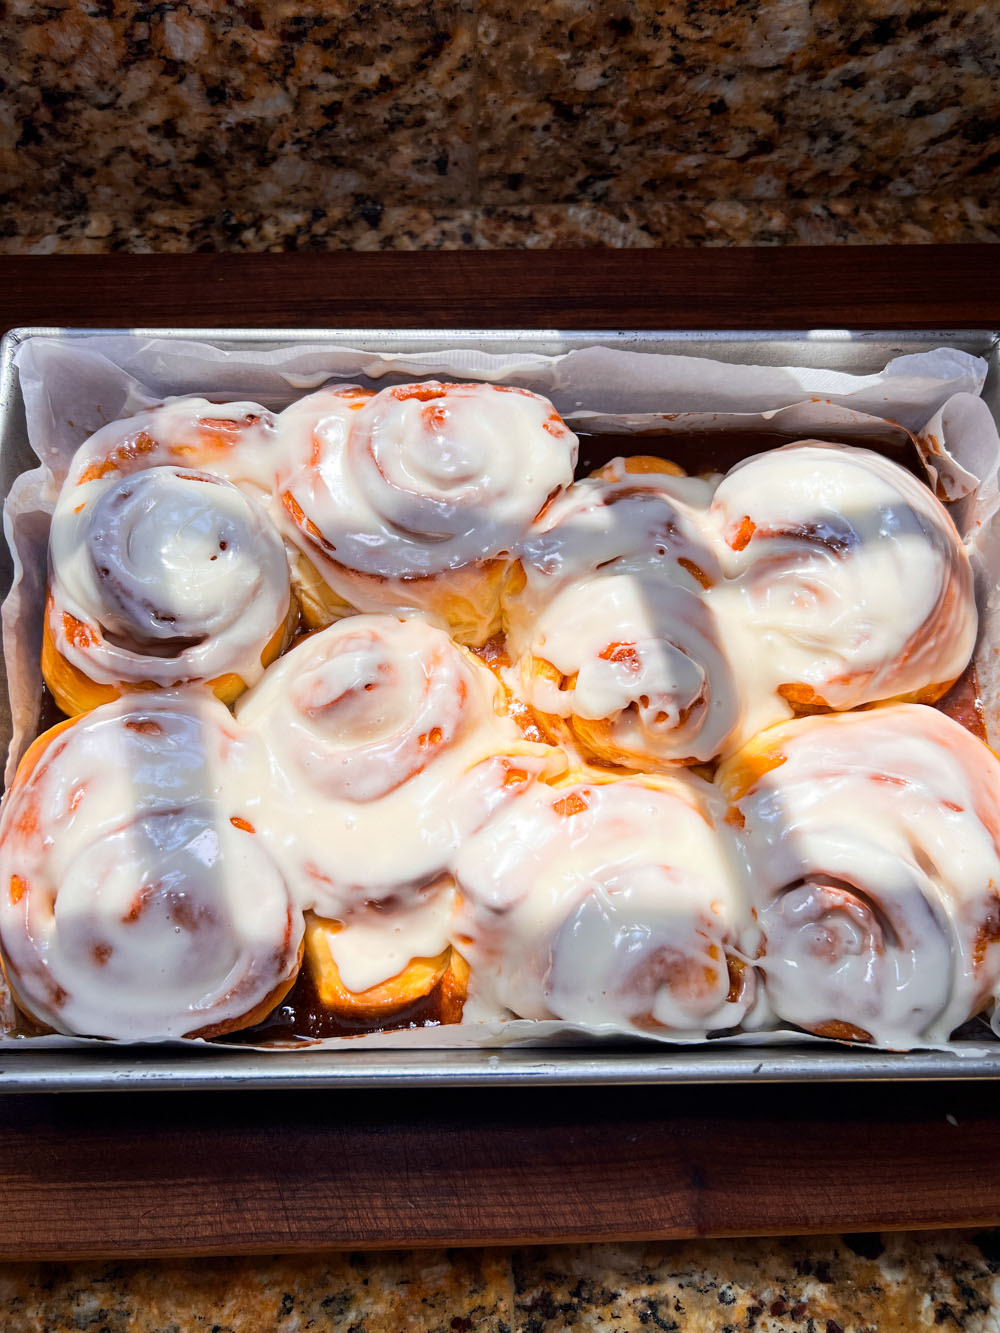
- After an hour, preheat your oven to 350 degrees F, then bake the rolls on the middle rack of your oven for 25-30 minutes or until golden brown. Remove the rolls and cool the pan on a trivet or wire rack for 10 minutes before glazing. You won’t use all of the glaze. However, some people like things ultra sweet so I’ll leave it up to you. The rolls are very sweet on their own, so you may find you’ll need less than you think. I recommend using a small amount for each roll, tasting, and then adding more if you so choose to. For photography purposes, I used a little more than I normally would.
- Allow the glaze to seep into the crevices for about 10 minutes, then enjoy.
- To reheat, warm in a microwave for about 15-20 seconds.
Notes
- 2 large eggs is about 1/2 cup, you will remove 2 tablespoons to get 70 grams. annoying, I know. but trust me. Because we hate to waste things, scramble that leftover 2 tablespoons of eggs or add it to another recipe. You could also use it as an egg wash for a different recipe.
- When using the ‘spoon in and level’ method, my 1-cup measuring cup got me 126 grams of bread flour per cup. When using the scoop and level method, I get 145 grams per cup. If you’re not weighing, this will vary for you.
- I’ve made this glaze with and without the cream cheese. I love both.
- Prep Time: 4 hours
- Cook Time: 30 minutes
- Category: dessert
- Method: baking
Keywords: cinnamon rolls, kings hawaiian cinnamon rolls, hawaiian sweet cinnamon rolls

Leave a comment