These homemade bagels are literal perfection. Nice chewy yet tender crumb, easy to adapt and customize. The only “difficult” thing about this homemade bagel recipe is the wait time. It’s definitely a make-ahead recipe, but I promise it’s worth it. You could add any sort of topping you want, or leave them plain. My favorite thing to do with them is to turn them into incredible breakfast sandwiches.
This recipe is adapated from Chef Steps. I’m sure other bagel recipes are just fine, but this one is just never leaving my arsenal and I’ve been using it for years! I am not interested in trying anything else because these give me exactly what I crave. I can make small bagels, or bagels big enough for sandwiches. Ever been to Panera Bread? Yeah, that large size with the barely-there hole in the center.
What you need to make the best homemade bagels
- Digital scale – it’s 2025, and I say this with love “Your kitchen should not be without a digital scale”. Using “cups” just doesn’t cut it anymore. There’s far too much wiggle room for measurements to be seriously “off”, resulting in an inconsistent outcome. Use the scale! You’ll get perfect results every single time. I even recommend grabbing a digital jewelry scale, too. Those are great for weighing extra light-weight ingredients such as yeast granules, extra fine powders, etc.
- Instant-read thermometer – again, it’s 2025. You should have one by now. This will ensure our water isn’t below or above 90’ish degrees. We don’t want to kill the yeast.
- Stand mixer with dough hook – this is a must! The stand mixer does nearly all of the work, and for quite some time (about 15-20 minutes) to create that very important gluten development that our bare hands alone just cannot. I mean, you COULD do this by hand, but it’s going to take you a long ass time and your arms will tire out.
- Half-sheet baking sheet – Make sure this can fit into your fridge. You need this to lay out your formed (and covered) bagels so they can ferment slowly and develop their amazing flavor.
- Bread flour – Gives us the best chewy crumb and sturdiness.
- Diastatic malt powder – this secret ingredient helps to promote an incredible rise, gorgeous golden brown color, and flavorful crumb.
- Barley malt syrup – this ingredient is added to the boiling water/baking soda mixture to give the bagels that signature brown color. You could use molasses in a pinch.
You’ll also need…
- Parchment paper or a silicone baking mat
- Baking racks to line your baking sheet
- Large pot
- Kitchen shears or a dough scraper to portion the dough
- Plastic wrap
- Non-stick spray
- Patience – the physical work put into this recipe is extremely simple, but because we’re looking for the best flavor, we have to let the dough slowly ferment overnight. I do not recommend skipping this step. Just put it this way, complete your prep-work on Friday to enjoy fresh bagels Saturday morning.
Baking time
- If using 125-130 gram portion-sized bagels, about 17-20 minutes to bake.
- If using 85 gram portion-sized bagels, about 14-17 minutes to bake.
Please keep in mind that all of our ovens vary, regardless of the temperature that it reads. With everything you cook, you just have to keep an eye on it.
I’m going to give you this recipe as I’ve adapted it to my preference, but you could totally make it your own. The only thing I’ve changed majorly is the size of the bagel. I like large “Panera-sized” bagels, so instead of an 85 gram portion, I use a 125-130 gram portion. If you prefer smaller bagels with a larger hole in the center, please use the 85 gram measurement instead.


The Best Homemade Bagels
- Total Time: 24 hours 30 minutes
- Yield: 8-16 bagels
Description
Literally the best bagels I’ve ever made. So easy and customizable. Recipe adapated from Chef Steps.
Ingredients
Sponge for the dough
- 250 grams bread flour
- 3 grams active or instant yeast
- 350 grams water, 90 degrees F
Remainder of the bagel dough
- 400 grams bread flour
- 25 grams granulated sugar
- 25 grams diastatic malt powder
- 10 grams fine sea salt
The next day
- Water for boiling
- 2 tablespoons Barely malt syrup or molasses
- 2 teaspoons baking soda
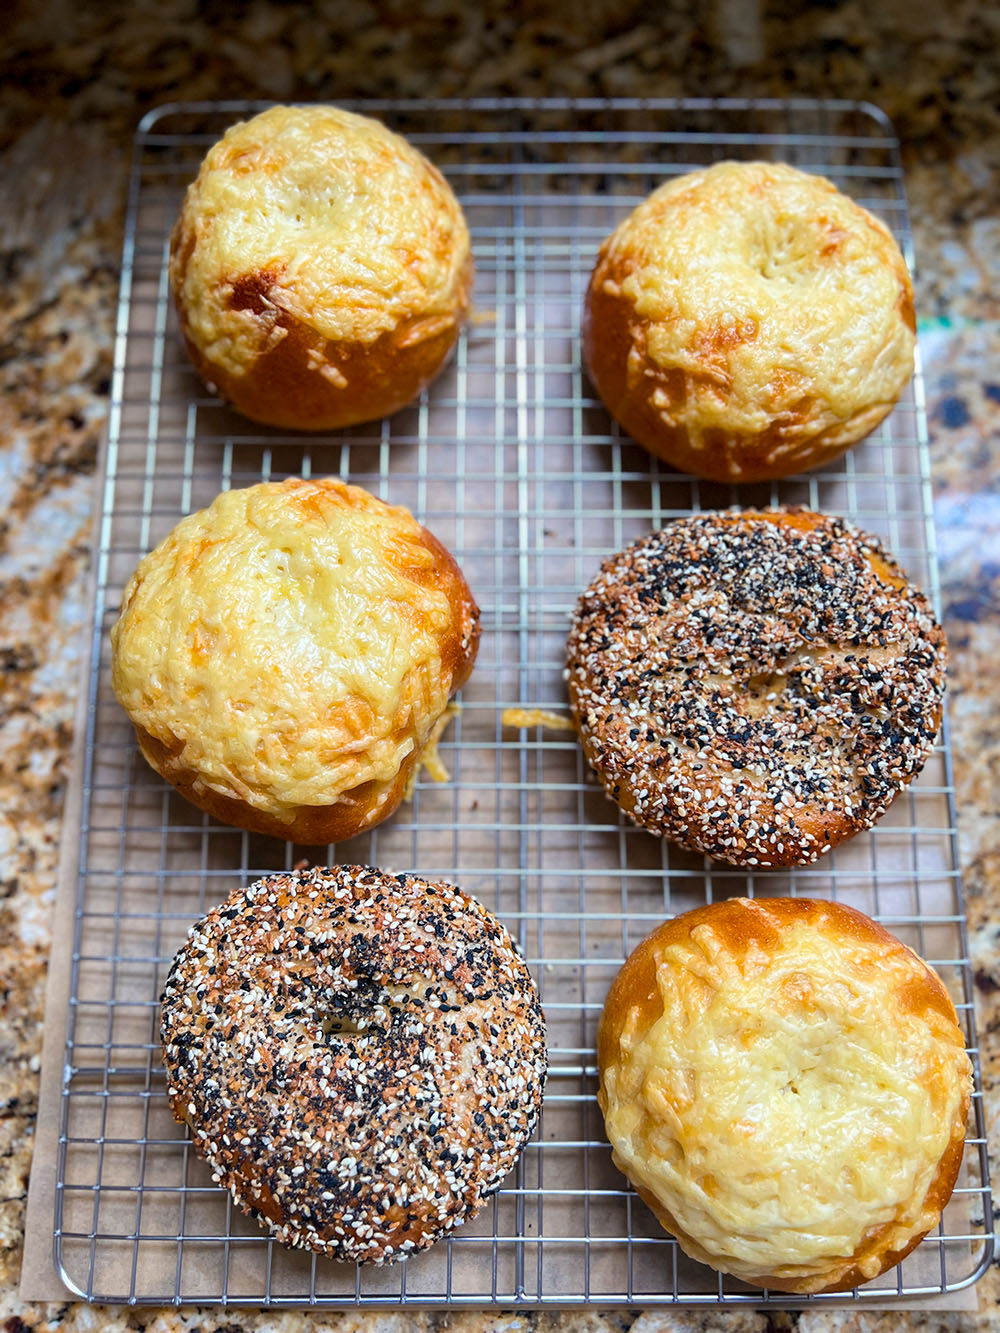
Toppings used
- Everything Bagel seasoning + 1 egg, beaten (to help the seasoning stick)
- Asiago or sharp cheddar cheese, shredded by hand
Instructions
To make the sponge for the dough:
- In the bowl of your stand mixer, combine 250 grams of the bread flour and yeast. Whisk together until combined. Pour in 350 grams of warm’ish water (about 90 degrees, NO HOTTER THAN THIS) and mix gently until well combined. Cover the bowl with plastic wrap and allow it to ferment for 2 to 3 hours. You should see a foamy, bubbly surface, and if properly proofed, the plastic wrap will start to dome upwards as the gases in the sponge build up.
For the remainder of the dough:
- In a separate bowl, combine the remaining 400 grams of bread flour, granulated sugar, diastatic malt powder, and fine sea salt. Whisk to full incorporate.
- Attach the dough hook to your stand mixer, and remove the plastic from the mixer bowl. With the stand mixer on low speed, spoon in the remaining bread flour mixture into the sponge. Allow the dough hook to do its thing and mix everything together. When no dry pockets of flour remain, increase the speed to medium and let the stand mixer knead the dough until it no longer sticks to the sides of the bowl. This can take anywhere from 10 to 20 minutes. Do not walk away from the mixer because you don’t want it to wobble off of the counter. That would be bad. You’ll know the dough is ready when it easily slides off the dough hook and isn’t sticky at all. It’s a soft but sturdy dough.
- Place the dough in a bowl and cover with plastic wrap. Refrigerate for 20 minutes to allow the dough to rest and relax. Line a baking sheet with parchment paper or a silicone mat, and keep a large piece of plastic wrap nearby. Lightly spray the surface of the parchment paper or silicone mat with non-stick cooking spray. Remove the dough from the refrigerator and using kitchen shears or a dough scraper, portion into 130 gram balls for 8 large bagels. If you wish to make smaller bagels, please weigh the entire ball of dough and divide by however many you bagels you want, and portion according to the math.
- Please watch the video above in the blog post to see exactly how to shape these bagels, because it’s easier to show you than to verbally explain it, but it’s super simple.
- Form each piece of portioned dough into a ball by gathering it into a little pouch and pinching the seams closed. Cup your hand over each piece of dough and roll it on the surface in tight circular motions to seal into a taut ball. When you finish each piece, place it on the lined baking sheet and cover with the plastic wrap. Refrigerate the dough balls for 20 minutes.
- To form the bagels, grab one ball of dough at a time and use the tips of your thumb and middle finger to pinch a hole through the center of the dough. Then use your two index fingers in a turning motion to slowly open the dough hole up into a bagel shape. Place each bagel back on the baking sheet or plate (you may need multiples), and cover with plastic wrap. Proof at room temperature for 40 minutes, then refrigerate overnight for the flavor to develop.
The next day
- Preheat your oven to 425 degrees F. Fill a large pot halfway with water and bring to a boil. Pour in the malt syrup or molasses and baking soda.
- Line a baking sheet with a cooling rack.
- Remove the bagels from the refrigerator and add up to 3 bagels to the boiling malt or molasses baking soda water, 60 seconds per side.
- Remove each bagel to drain on the lined baking sheet.
To top
- When all of the bagels are boiled, top with asiago cheese, about 1/4-1/3 cup each, depending. If making “everything” bagels, brush each bagel with the beaten egg. Pour some everything bagel seasoning onto a plate then dip the egg-washed bagel into the seasoning to help it adhere.
- Bake however many bagels you can fit with 3 inches of space between them on the middle rack of your preheated 425 degree F oven for 15-18 minutes, rotating the tray halfway between baking for even color. If you want to make sure the centers are fully cooked, you can insert an instant-read thermometer into one of the bagels and if they read anything above 200 degrees F internally, they’re done.
Allow them to cool for about 10-15 minutes, then enjoy!
Notes
Baked bagels can be stored in an airtight container or plastic zip bag for up to 3 days at room temperature, depending on the temperature of your home. If your home is very warm and may cause baked items to mold faster, store them in the fridge.
They also freeze extremely well — just wrap them individually in plastic wrap then store into a large freezer bag, removing as much air as possible. Frozen bagels will last up to 2 months.
- Prep Time: 24 hours
- Cook Time: 30 minutes
- Category: baking, breakfast, brunch
Keywords: homemade bagels, bagels, the best bagels, how to make bagels

Leave a comment